The BayLibre LAVA Box: An Embedded Linux CI Lab Inside a PC Case
At BayLibre, we have the pleasure of working with the world’s best OEMs and silicon vendors on a wide range of projects. We get to play with the latest technology to ensure that it’s supported in the upstream Linux kernel, which means we use a lot of development boards every day.
And as any embedded Linux developer will tell you, it can be a real pain to work with multiple boards while you’re writing and testing code. Connecting up new boards, power-cycling, plugging in peripherals. Doing things by hand consumes a lot of time. That’s time better spent fixing bugs and writing new features. Not to mention the office mess that occurs when you’ve got over 10 boards connected with serial, power, and USB peripherals.
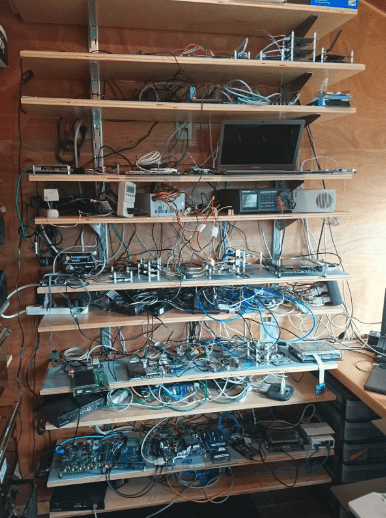
To illustrate the point, here’s a picture of Kevin Hilman’s home lab. It shows how quickly things can get out of hand when you’re doing Continuous Integration (CI) and helping kernelci.org to perform 2,680 boots of the latest kernel changes across 271 unique boards every day.
This got us thinking: is there a way to contain the mess and simplify administration of our boards? Fitting everything inside a single case was a hard requirement since some of our staff work from home and don’t have the space to house industrial-grade racks. We also wanted to encourage new kernelci.org labs and have something that would provide a foundation for custom CI solutions for our partners.
For a BOM cost of under €400 (for brand-new components), we built an entire lab inside of a PC case that ticked all of these boxes and validated our idea. Kevin Hilman and Patrick Titiano unveiled the project at Embedded Linux Conference Europe 2017. We call it the “LAVA Box”.
LAVA Box Design
Because the LAVA box provides an entire CI solution, it contains both hardware and software parts. The software portion is made up of LAVA server (master) and dispatcher (slave). The server provides a web interface and handles things like job scheduling and priorities, and board description files which greatly simplifies administration.
The dispatcher manages connections between the boards and the real world. It provides services like DHCP, TFTP, NFS, etc, handles USB fastboot and mass storage, and power switching for all devices under test (DUT). Serial connections are handled by the dispatcher and udev rules are used to ensure that serial consoles have the same device path every time they come up. Once you’ve connected your devices and written the description files, the day-to-day tasks are completely automated.
Both the server and dispatcher run inside of individual containers which are managed with docker-compose. While it’s possible to run the two containers separately for a scaled-out lab, we host everything on one machine for the LAVA Box proof of concept.
On the hardware side, everything is neatly housed inside a PC case. Boards are mounted to the case’s drive bays which makes it simple to swap them out for maintenance or administration. A standard PC PSU is able to supply enough power rails (molex/ATX connections) for the host computer and 5 DUTs with connectivity (network, power control, USB, etc). It would be possible to power even more devices with a more powerful PSU and a bigger case (or if you’re willing to run cables outside of the case).
We found that the +5v and +12v rails from a standard ATX PSU worked well for powering our DUTs. Though the lack of configurable voltages is a minor limitation, we were able to live with it. A critical piece of functionality is power switching for DUTs and there are lots of inexpensive options available on the market, such as USB-controlled relays. We used the fully-open ACME Cape because, apart from controlling power, it also measures power consumption.
All the DUTs communicate on an 8-port switch and sit on an internal network that is isolated from the outside world. Even though the LAVA box master requires Internet access in our configuration (to pull down CI jobs from kernelci.org), it is possible to run in a LAN-only mode for local jobs.
Our prototype is just one possible way to configure the LAVA Box. Due to the modularity of the design, and the open documentation and software, you can build your own “lab in a box” using different hardware components and software provided it uses the kernelci API.
The Automotive Grade Linux project has taken advantage of this flexibility to build their own LAVA box. We improved the KernelCI API to level-up the quality of their releases and the new API allows AGL to run platform, AGL-specific, and automotive-specific tests everytime new code is committed. In a group with over 100 member companies, scaling engineering effort is super important and our automation and CI work has significantly improved the overall quality of the AGL CI loop.
The hard things about building labs
It took us a long time to build our LAVA box prototype. But we learned some valuable lessons along the way that will save you time and energy if you want to build your own.
1. You need to balance DUT power consumption
One of our wishlist items was more power rails. This doesn’t necessarily mean we want more power, simply that we want more rails to connect more DUTs. In the future, we’ll move to a more powerful ATX unit since they usually come with an increase in the number of connectors.
2. Cheap USB cables are flaky
There are lots of brands that produce low-cst USB serial cables. Few of them work for very long. We had many issues with connectors only working for a short period of time and requiring unplugging before they’d work again. We ended up settling on FTDI cables as we found them to be much more reliable than other brands.
3. There’s not a lot of space inside a PC case
Things are tightly packed inside the case which means that cooling may become an issue if your DUTs run hot. We specifically purchased a PC case with front and rear fans to keep the internal temperature down.
4. There’s no standard DC power jack
Every DUT has its own connector, so you need to be comfortable pulling out the soldering iron to connect the power. This obviously isn’t for everyone and right now we don’t have a good solution for this. Hopefully this problem will eventually be solved by increased adoption of USB Power Delivery via Type-C connectors, but for now, board rework is often required.
Future plans for the LAVA box
We poured all of our embedded systems experience into designing and building the LAVA box and validating our idea. Based on the feedback we’ve received from AGL, and from what we’ve seen in our own labs, it’s been a roaring success. The LAVA box has productized the CI workflow for embedded Linux.
We’re not done yet and we have some more tweaks in mind for the current design such as improving connectivity by adding Wi-Fi and Bluetooth. Ater that, we’re going to take the things we learned and address new scenarios like building a cost-effective solution for single-board labs and scaling up to professional-grade labs in racks. That way, labs of all sizes can benefit from the power of CI.
If you want to join in you can start by reading the documentation and contributing to the KernelCI project on GitHub. This entire project is open source and community contributions are greatly appreciated.
Or perhaps you want to talk to us about building your own lab in a box? Reach us at contact@baylibre.com to see how we can help!


